Manual · Feature Tour

See everything it does
before you download.

A page-by-page walkthrough of the whole plugin — every screenshot is from the live app. The player is free forever; the Pro features and preset packs are marked as we go.

Covers the current release. New here: the STAGE view with scenes, the STUDIO view, and preset export to hardware.

Getting started Interface Views & scenes Amp Multichannel amps Pedalboard EQ Multiband comp Cabinet Time FX Capture studio Library & TONE3000 Dual rig MIDI Presets & packs

1 · Getting started

Installed and playing in two minutes

One signed installer per platform — Windows (VST3 + Standalone) and macOS 11+ (AU + VST3 + Standalone, one universal build for Apple Silicon & Intel). No account, no activation — the player is free forever.

  1. Run the installer and choose your formats. Both are digitally signed — Authenticode on Windows, notarized by Apple on macOS — so they install cleanly, no warnings to bypass.
  2. On first launch it fills your library with factory content — the Brit 800 hero pack (our launch gift), its 18-capture GAIN sweep with a real working gain knob, the GD-808 Green Drive pedal, presets and a factory cabinet — so it makes real sound immediately, and it opens on a preset rather than on silence.
  3. In a DAW, drop NAM 9000 on a guitar track — VST3, or AU in Logic and GarageBand. Standalone? Pick your audio interface in Options and play.
  4. Set Input so the meter sits healthy — or press AUTO under Output and play your loudest: it sets the output level for you, and the knob turns red if anything ever clips.
  5. Pick a preset and go. New to amp sims? Hover any knob — a small card explains it in plain language (the ?-button in the bottom bar turns the explainers off).

The interface renders through the system webview — Microsoft Edge WebView2 on Windows (ships with Windows 11 and current Windows 10; the installer links the free download if it's ever missing) and WKWebView on macOS, which is built into the OS. Nothing extra to install on a Mac.

2 · The interface

One window, a row of pages

A top toolbar of global controls, a page for each part of the rig, and a bottom bar of utilities. The whole UI is vector art, so it stays razor-sharp at any size.

Always visible

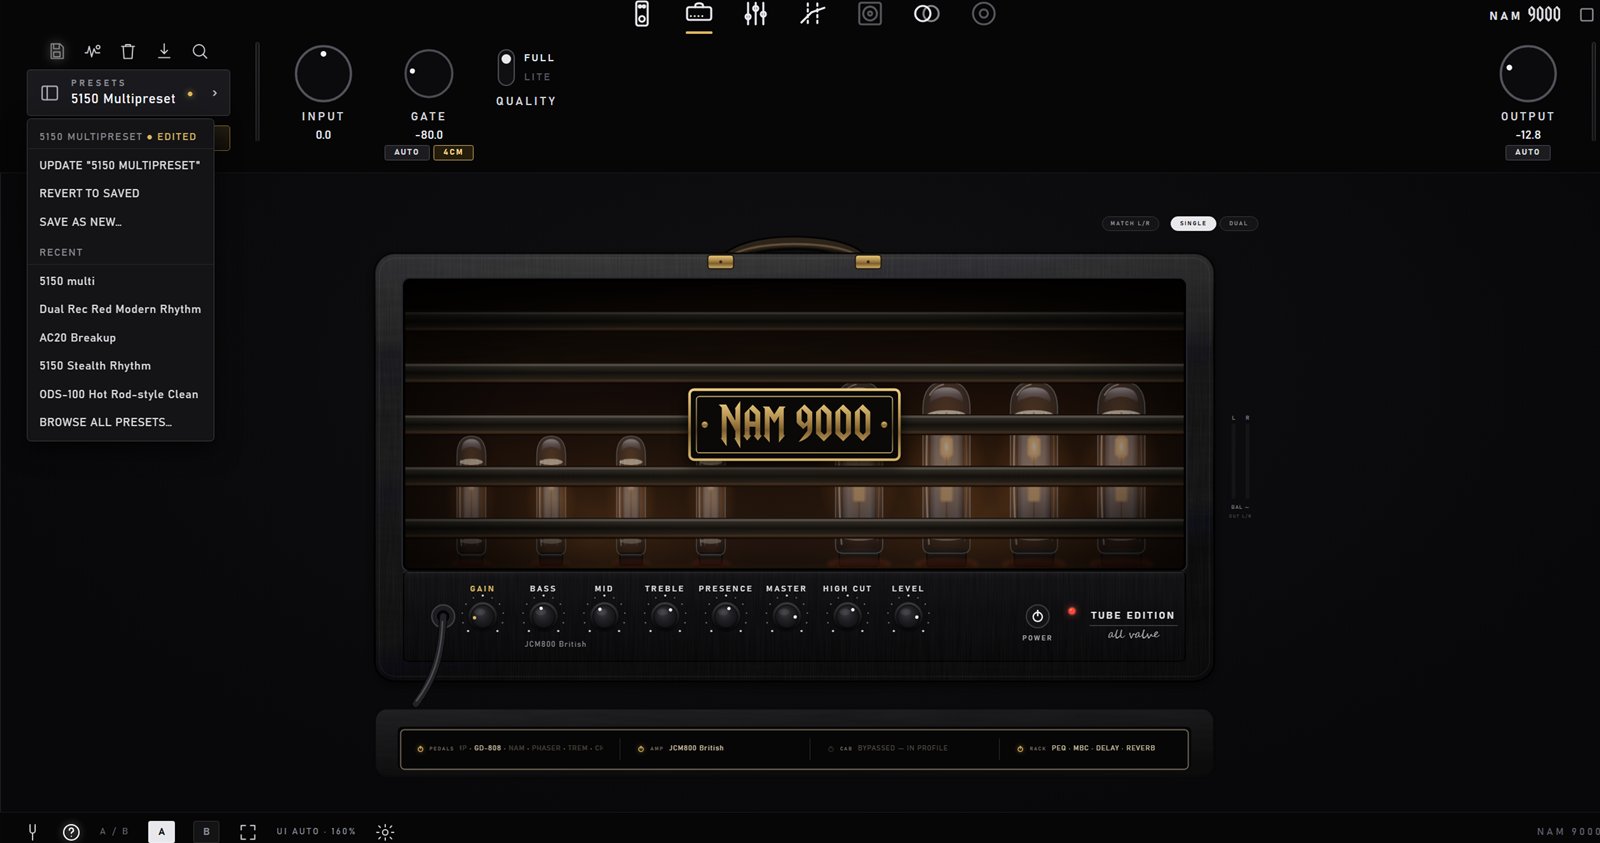
The preset chip menu open, with UPDATE, REVERT TO SAVED, SAVE AS NEW and recent presets
The preset chip and its menu — the dot means the rig has drifted from the saved version. The rig plate sits under the amp.

The rig plate — the whole signal chain at a glance

Under the amp sits a brass plate listing what is actually in your chain right now: PEDALS, AMP, CAB and RACK, each naming what is loaded and engaged. It is not decoration — every cell is live:

Input calibration — optional, for profiles that carry a reference

Some captures record the analog level they were made at. If yours do, and you want them driven exactly as hot as the capture rig was, open the UI-size popover and tick Calibrate to under INPUT CAL, then enter what your interface clips at in dBu (0 dBFS = that level — most Hi-Z guitar inputs are +12 to +13, and 12.2 is the common convention other loaders use). Profiles without that metadata are left completely alone, and with the box unticked levels pass through as-is — so this is a nicety for matching reference-carrying profiles, never something you must set up before playing.

Lite graphics — for older machines

The interface's moving glow, tube flicker and worn-metal textures cost GPU/CPU that an older laptop may want back. Click the UI-size label in the bottom bar and enable Lite graphics (static) under GRAPHICS: those elements become static, the meters stop animating, and the interface CPU roughly halves — the amp page benefits most. The audio path is untouched — it is purely paint work — and the setting is remembered per machine.
3 · Three views

Console, stage, studio — one rig, three ways to stand in front of it

The tabs top-centre switch how the same rig is shown. Nothing loads or changes when you switch — the two extra views are built when you enter them and torn down when you leave, so they cost nothing while closed. Esc always brings you back to CONSOLE.

CONSOLE

The page-per-block view everything below describes: stomps, amp, EQ, multiband, cab, time FX and the capture studio, with the rig plate under the amp. This is where you build a tone.

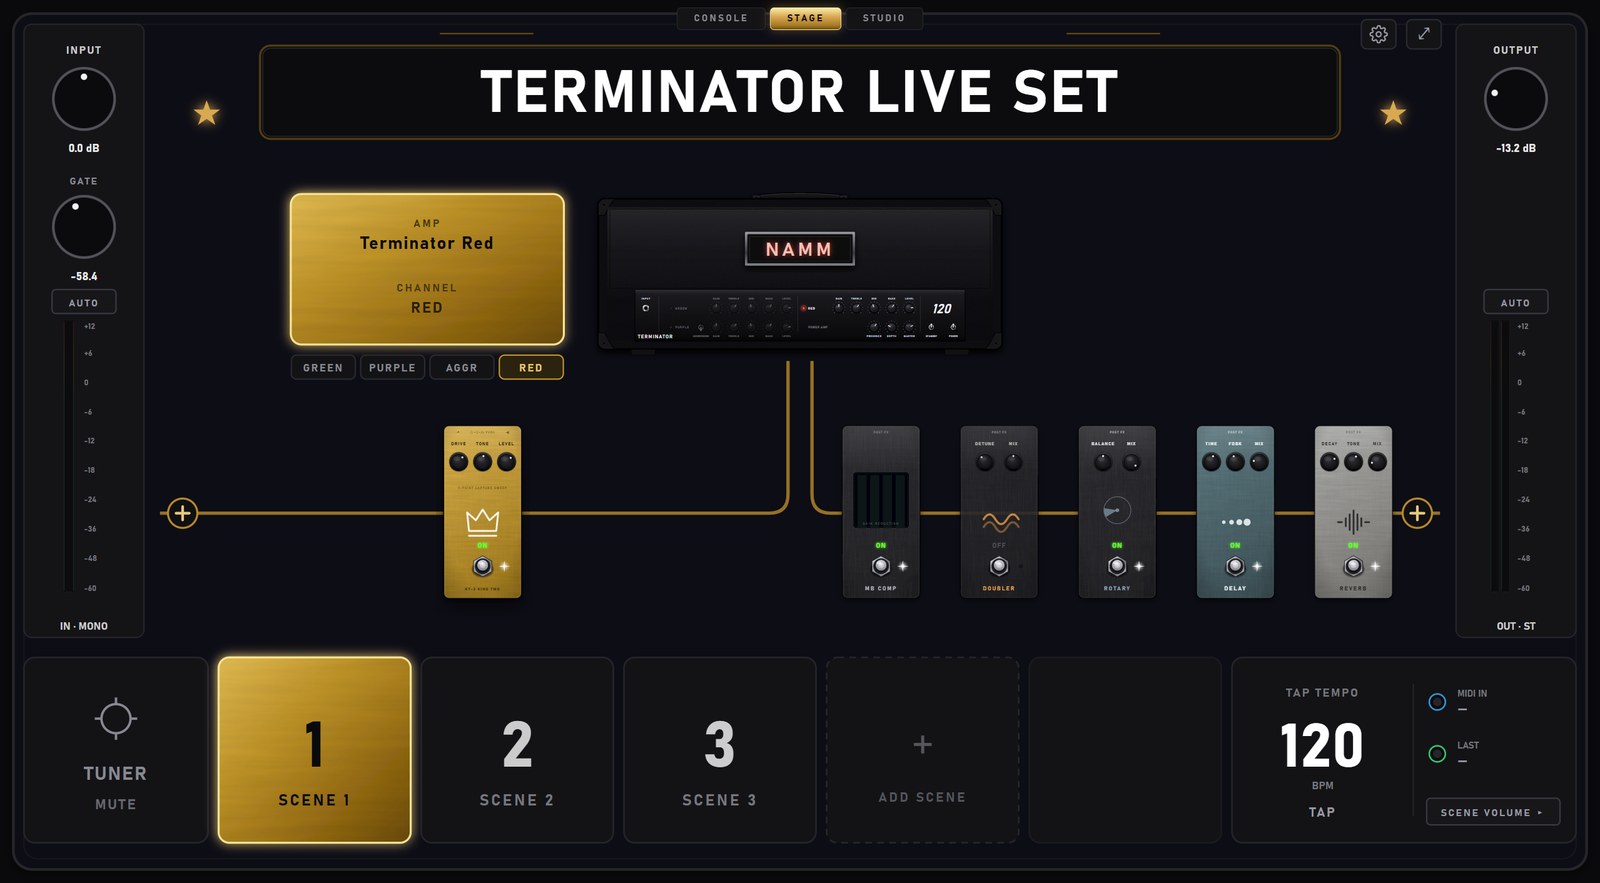
STAGE — the live view, at standing distance

The STAGE view: pedalboard, amp head with its channel buttons, rack pedals, IN and OUT rails, and the scene strip along the bottom
STAGE — a four-channel head with its channel buttons, the board either side, three scenes and SCENE VOLUME in the strip below.

Fullscreen, big, built from your actual gear: the pedals on your board on the left, the amp (or both amps in a dual rig) in the middle with a gold card naming AMP / CHANNEL / CAB, the rack effects as three-knob pedal faces on the right, and two rails — IN with the gate and its AUTO, OUT with the level, a stereo meter and a huge tuner and tap-tempo readout. Everything is live: knobs turn, footswitches click, channel buttons switch the head.

The two OLED screens on the EQ and MB COMP faces show the live spectrum and the four gain-reduction bars; both park when their unit is bypassed. Scenes travel inside the preset file, so a preset without scenes is byte-identical to before.

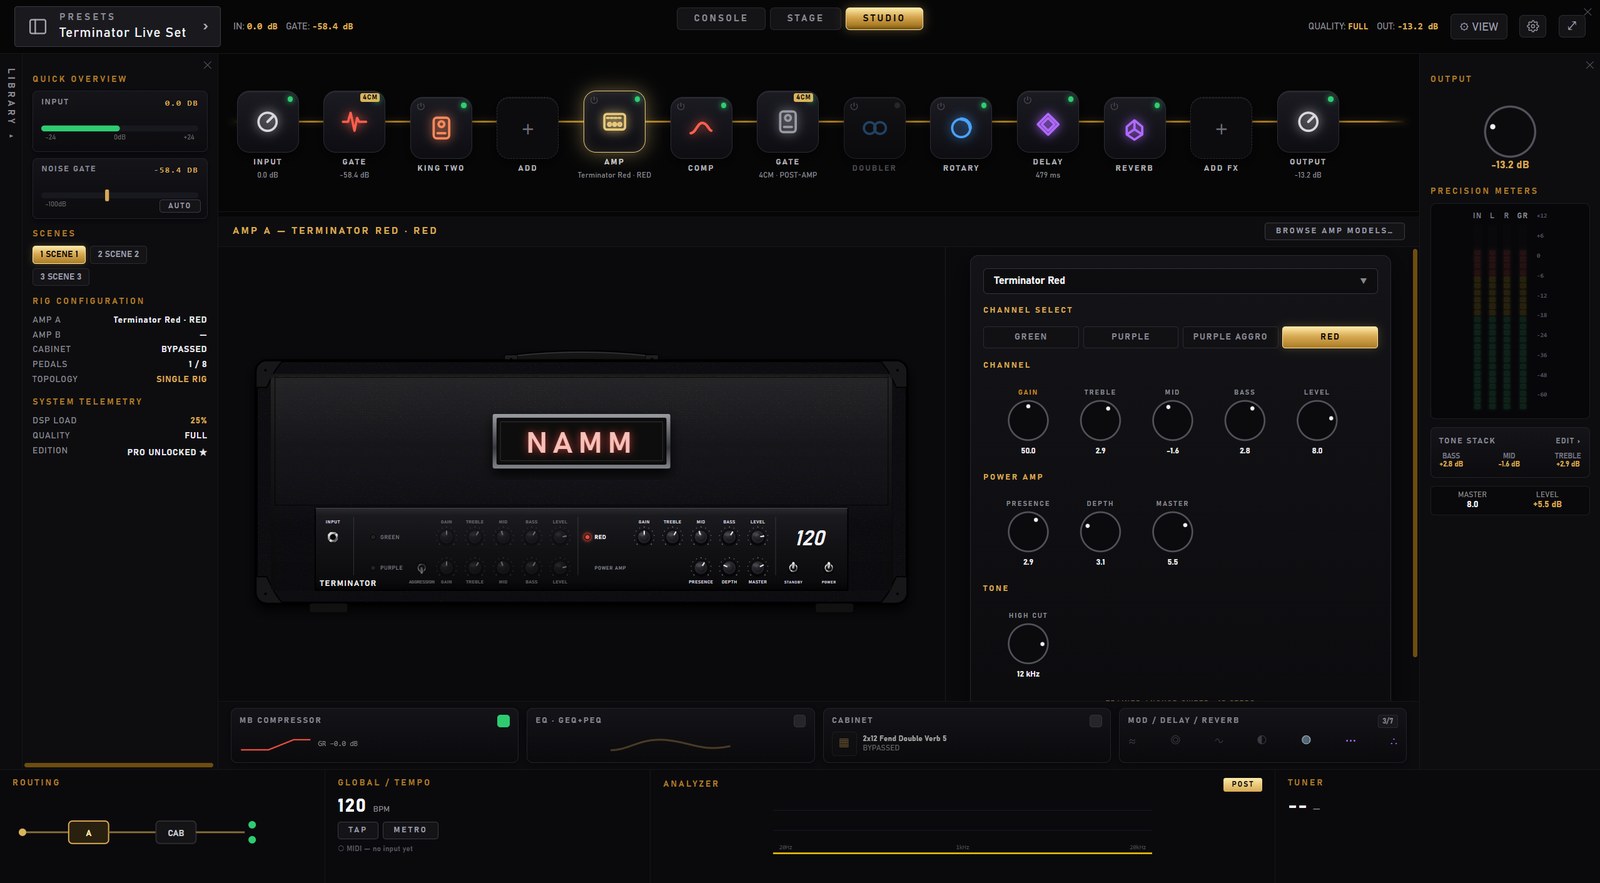
STUDIO — the mixing engineer's view

The STUDIO view: the chain grid across the top, the amp editor with channel select and printed knob values below, rails and telemetry around it
STUDIO — the chain as a grid, the selected amp's editor below it with CHANNEL SELECT and live values, meters right, routing and analyzer along the bottom.

The whole chain as a grid of blocks in true processing order — IN → pedals → GATE → AMP → CAB → EQ → MB COMP → rack → DELAY → REVERB → OUT, with a dual rig split into A ⫽ B lanes that merge at a MIXER block — and the selected block's full editor in the window below. Frames around it carry what an engineer glances at: a left rail with scene chips, rig summary, DSP load and edition; a right rail with IN / OUT-L/R / GR meters and the output knob; a bottom strip with the routing map of the real rig (dual amps, dual cabs, the 4CM post-gate), tempo and TAP, the last MIDI CC seen, and the tuner.

Settings and maximize are the same two icons top-right in all three views. On a 4:3 or small screen STUDIO stacks its frames; the console pages are unaffected by anything you do in the other two views.

4 · The amp

Any neural capture, fully gain-staged

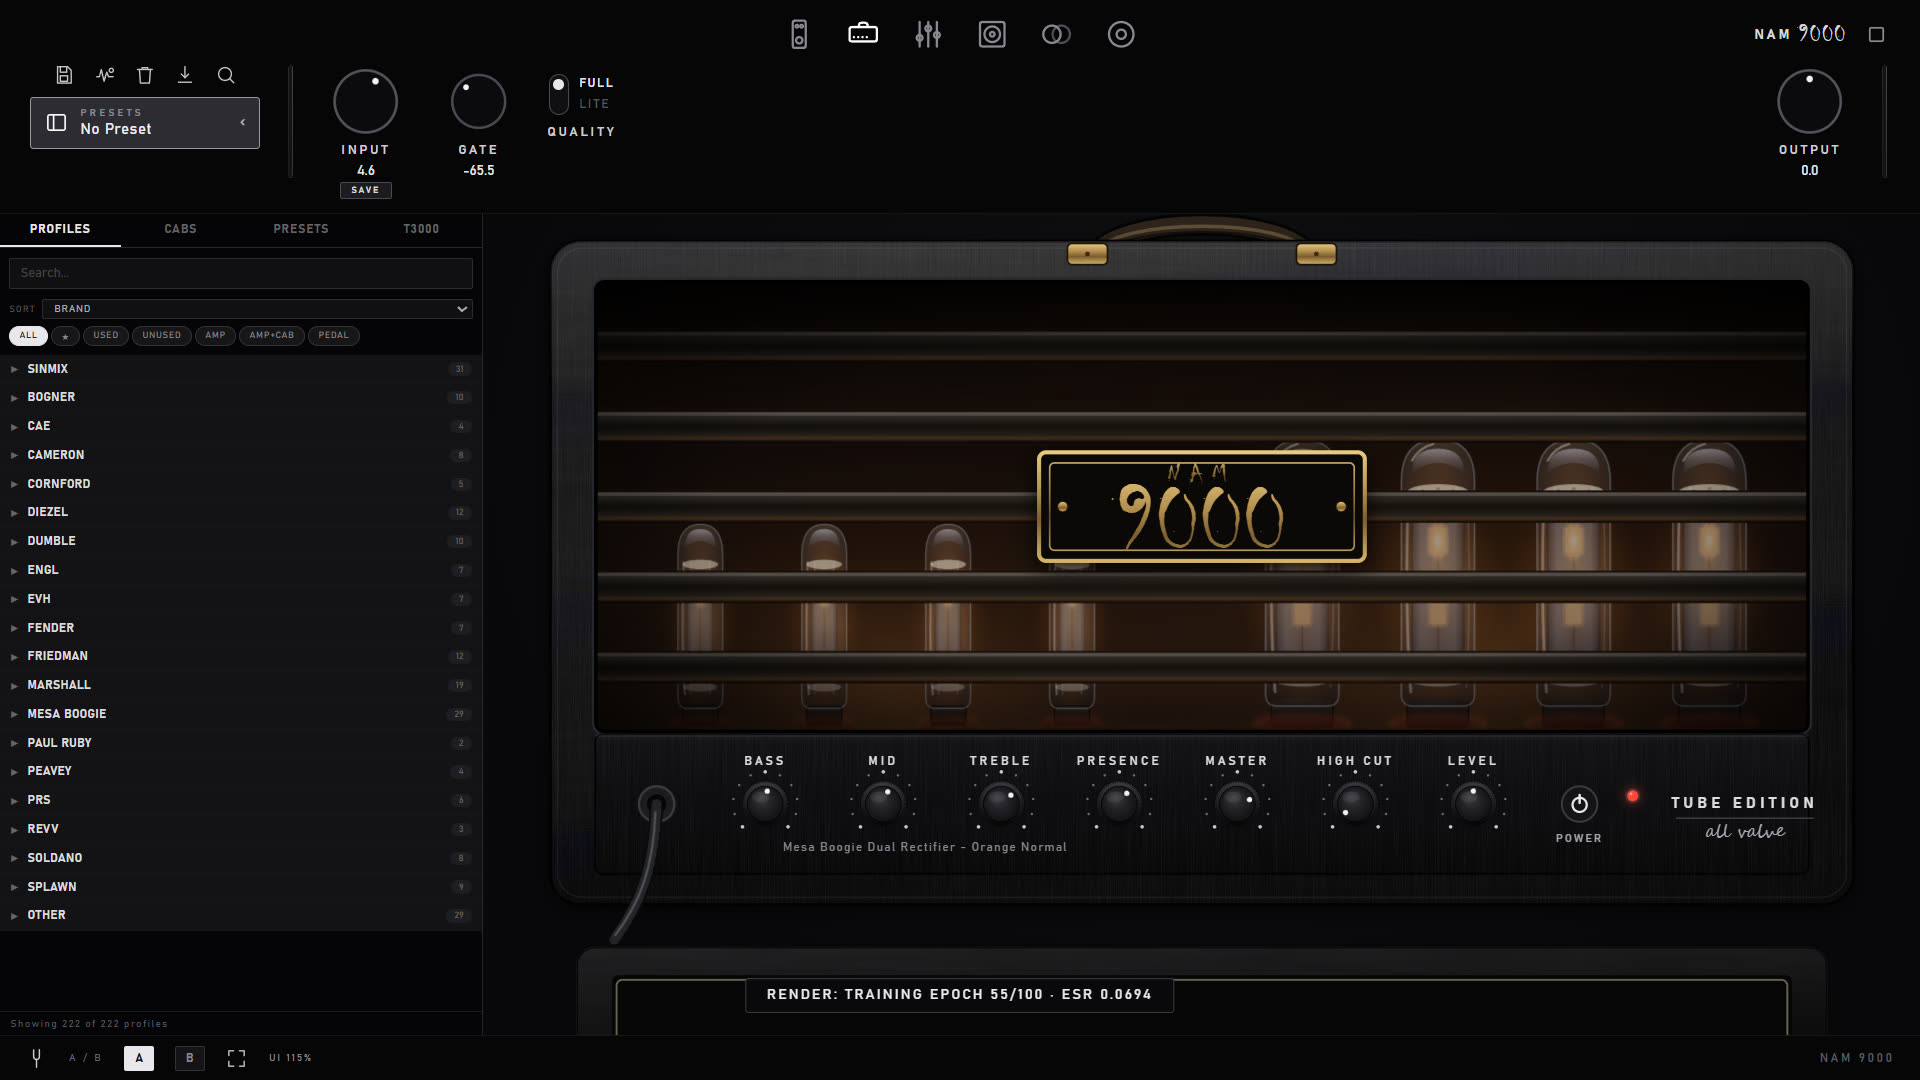
The heart of the rig. Load any standard .nam profile — from the built-in library, TONE3000, a preset pack, or your own captures — and dial it in on a real amp panel.

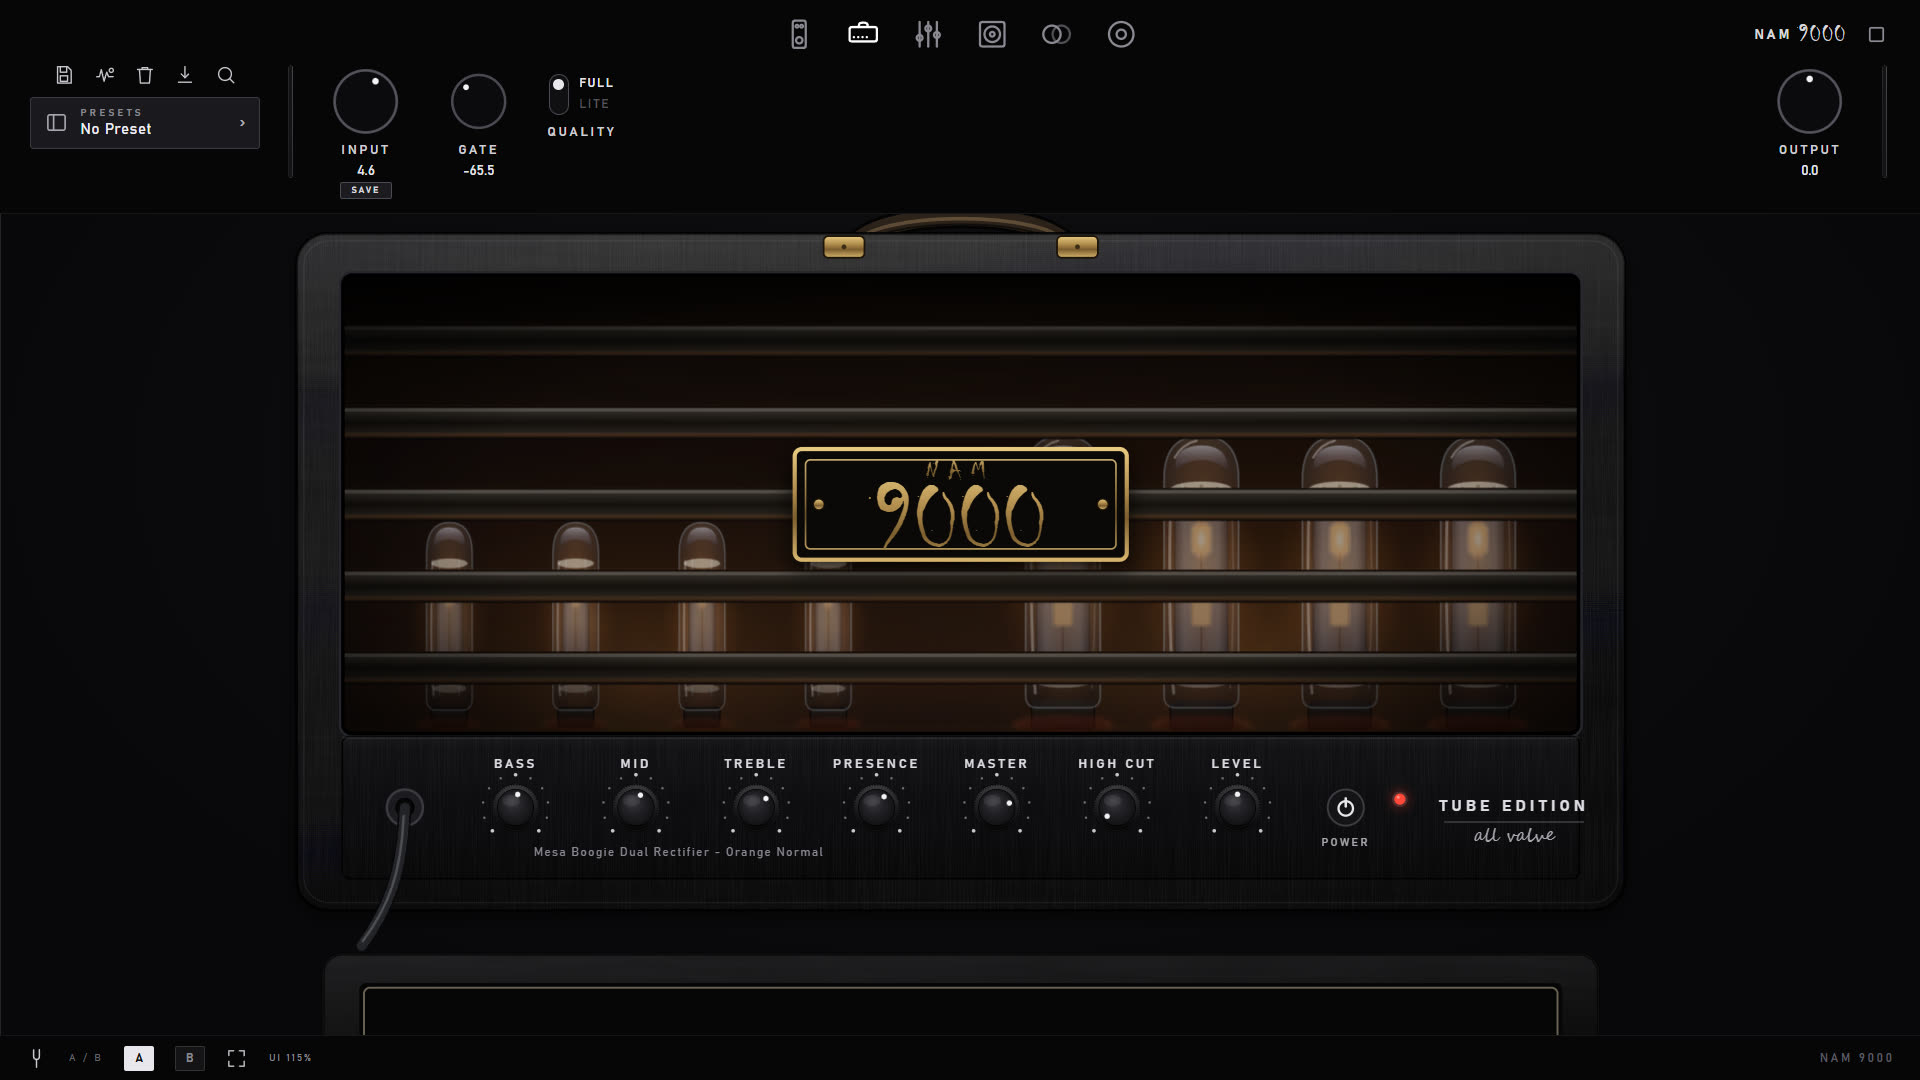
The amp page
The amp page — profile name under the tone stack, rig plate below.

5 · Multichannel amps

The whole head, channel switch and all

A normal capture freezes an amp at one setting. A multichannel amp is the entire amplifier: every channel captured as its own gain sweep, presented as the real head with its own faceplate and switches.

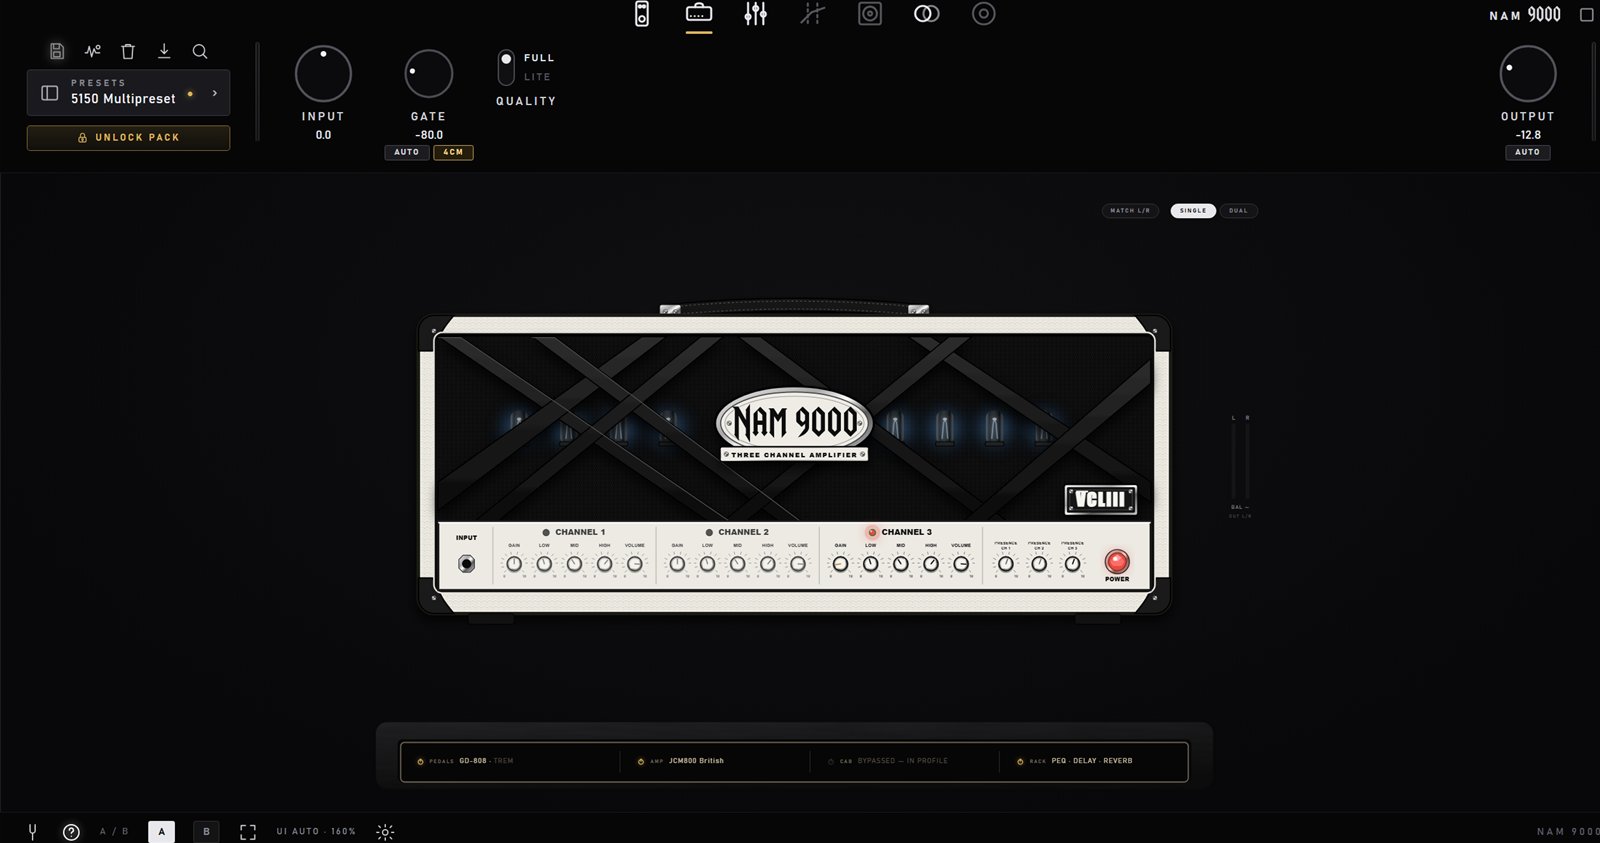
A three-channel amp loaded as one head with its own faceplate
A three-channel head — click a channel to switch; each keeps its own settings.

Multichannel amps are optional add-ons (one is included with NAM 9000 Pro). Unlocking is one step — paste the key, see Unlocking what you bought. See the packs page.

6 · The pedalboard

A reorderable stomp chain — with captured drives

Drag pedals into the order you want: a compressor, the GD-808 Green Drive, a slot for any captured pedal, plus boost, wah, pitch, phaser, flanger, tremolo and chorus.

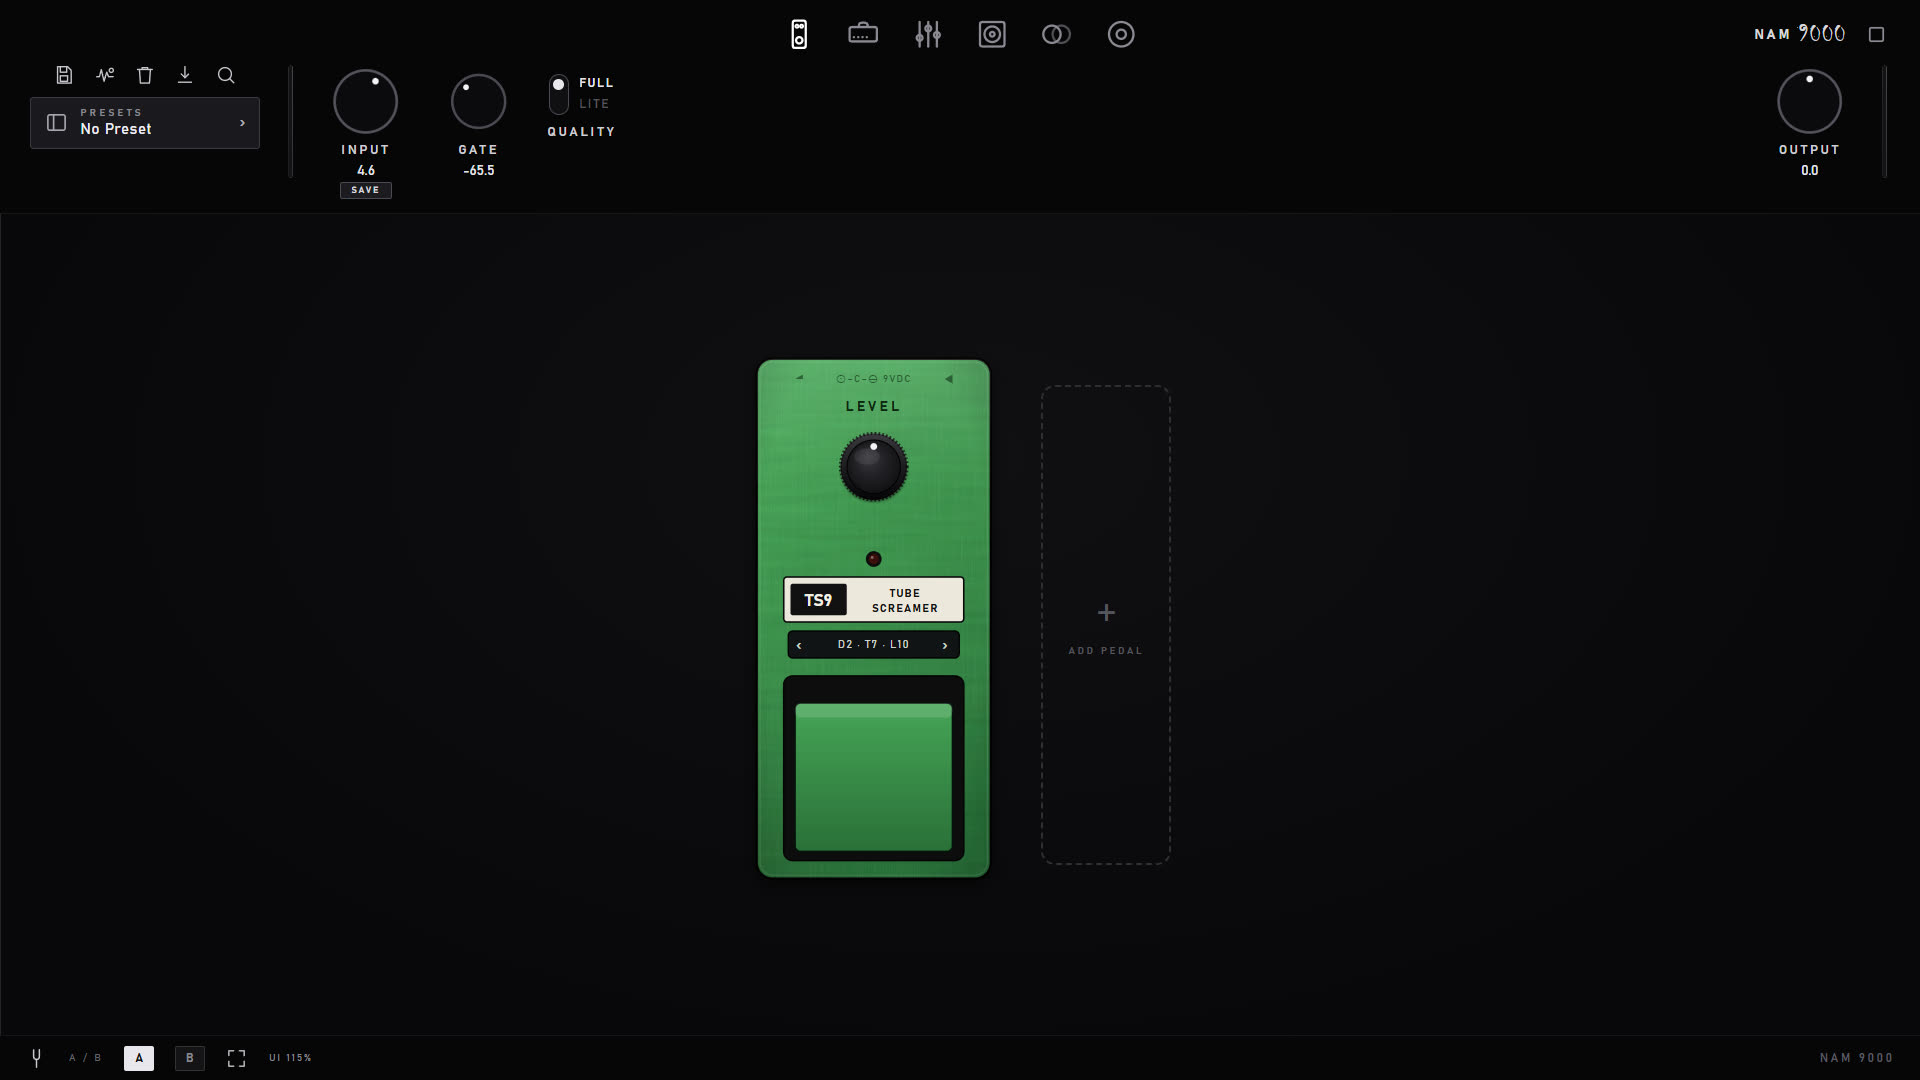
The pedalboard page
The pedalboard — drag to reorder; each pedal engages and bypasses with a click.

GD-808 Green Drive — the screamer, captured nine times

The built-in overdrive is not a filter pretending to be a pedal. Its DRIVE knob rides nine real captures of the pedal taken across its drive range, so every position is the actual circuit clipping the way it really does at that setting. TONE and LEVEL work as they do on the hardware (TONE at noon is the capture untouched). It ships with the free app — turn the knob and you can hear exactly what a multi-captured pedal buys you before paying for one.

Fifteen more drives, free to audition

The ADD PEDAL menu lists fifteen more drives, grouped the way players think — Screamer, Modern boost, Transparent, Tube, Distortion, Fuzz and Bass. Every one is a multi-point capture with the same working DRIVE knob. Three of them are our own circuits rather than captures of famous boxes: NAM BOOST, NAM LEAD and CIRCUIT SLAMMER. You can play any of them for 30 seconds at a time before you buy, marked PREVIEW, so you hear it in your own mix first; buying just stops the clock.

The NAM CAPTURE slot

All the non-captured effects are in-house DSP, and engage/bypass is crossfaded rather than switched, so you can build tones while you play. The rig plate's PEDALS ⏻ master drops the whole board and brings back the same set.

7 · Studio EQ

A graphic and a parametric — at the same time

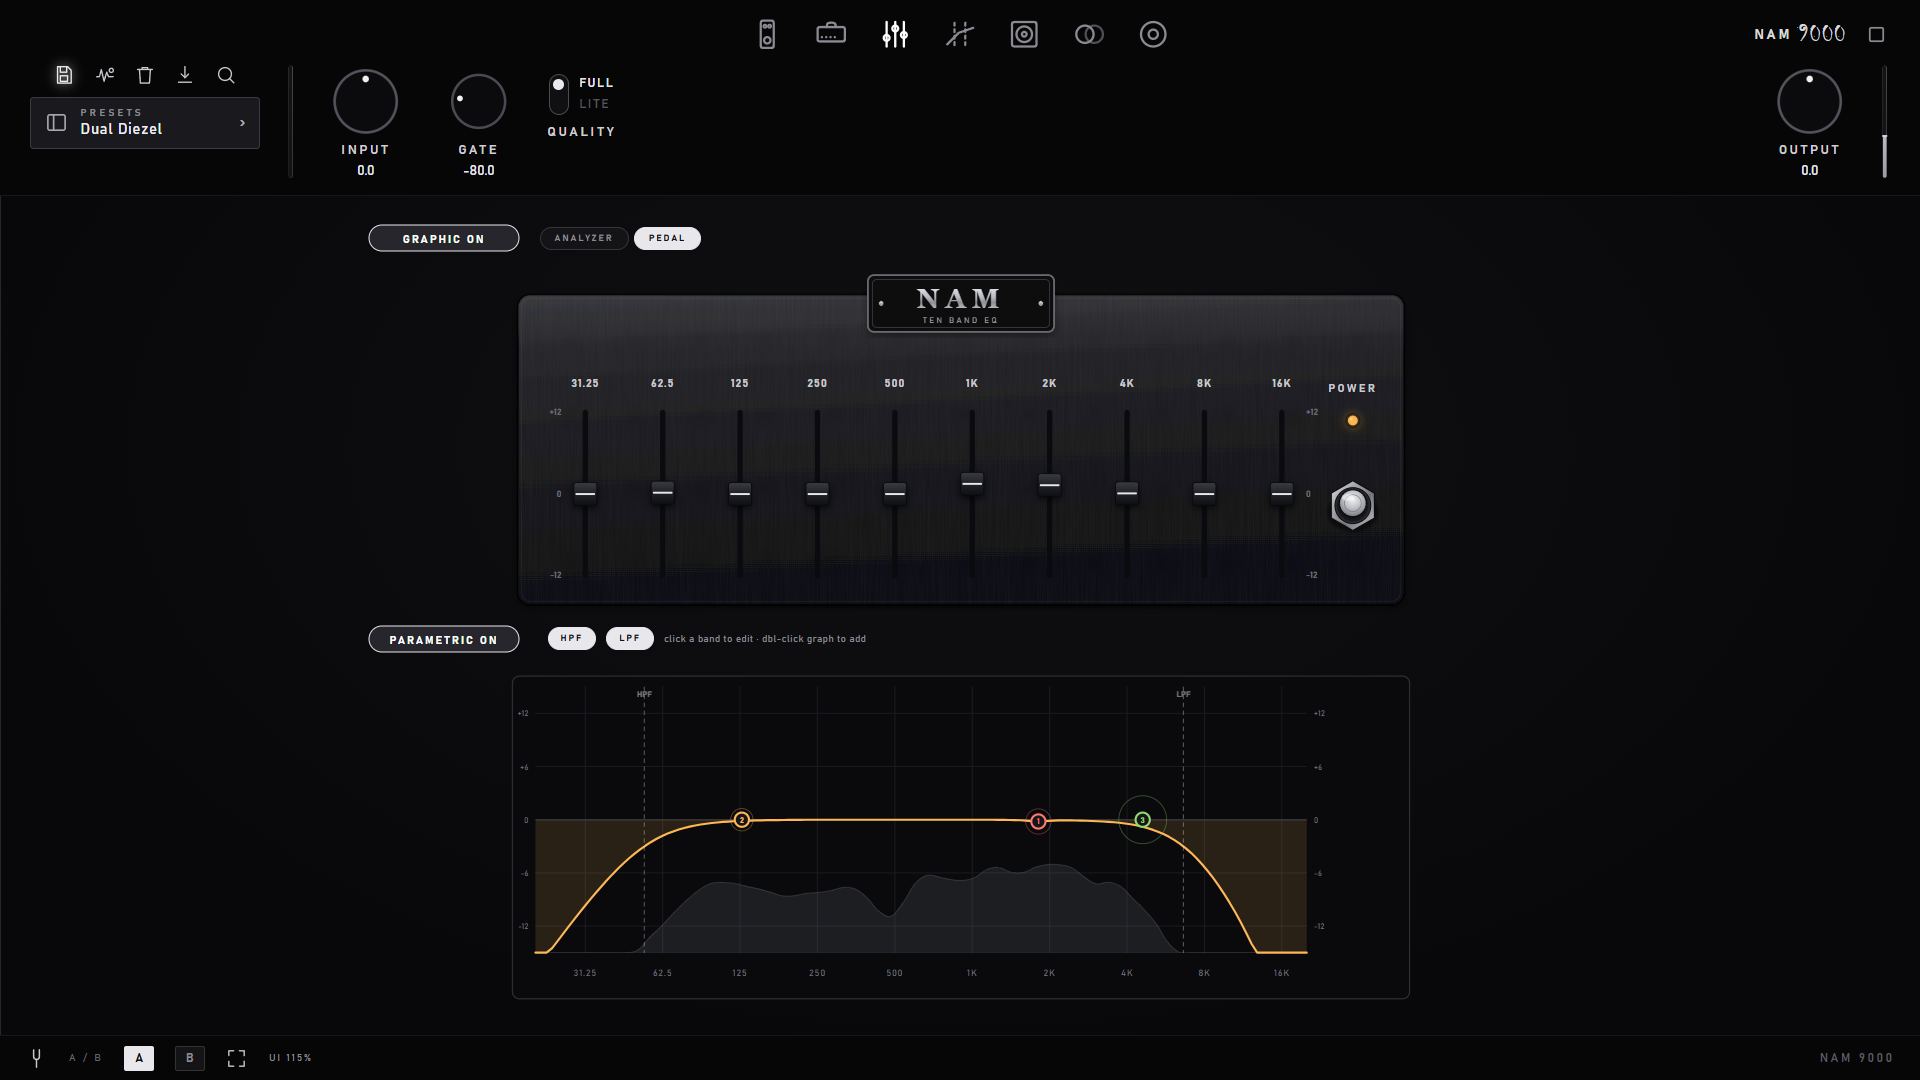
Two independent EQ panels with live analyzers: a 10-band graphic rack unit and an 8-band parametric, both usable at once for surgical and broad shaping.

The EQ page
The parametric EQ on its live analyzer.

8 · Multiband compressor PRO

The metal-mixing weapon

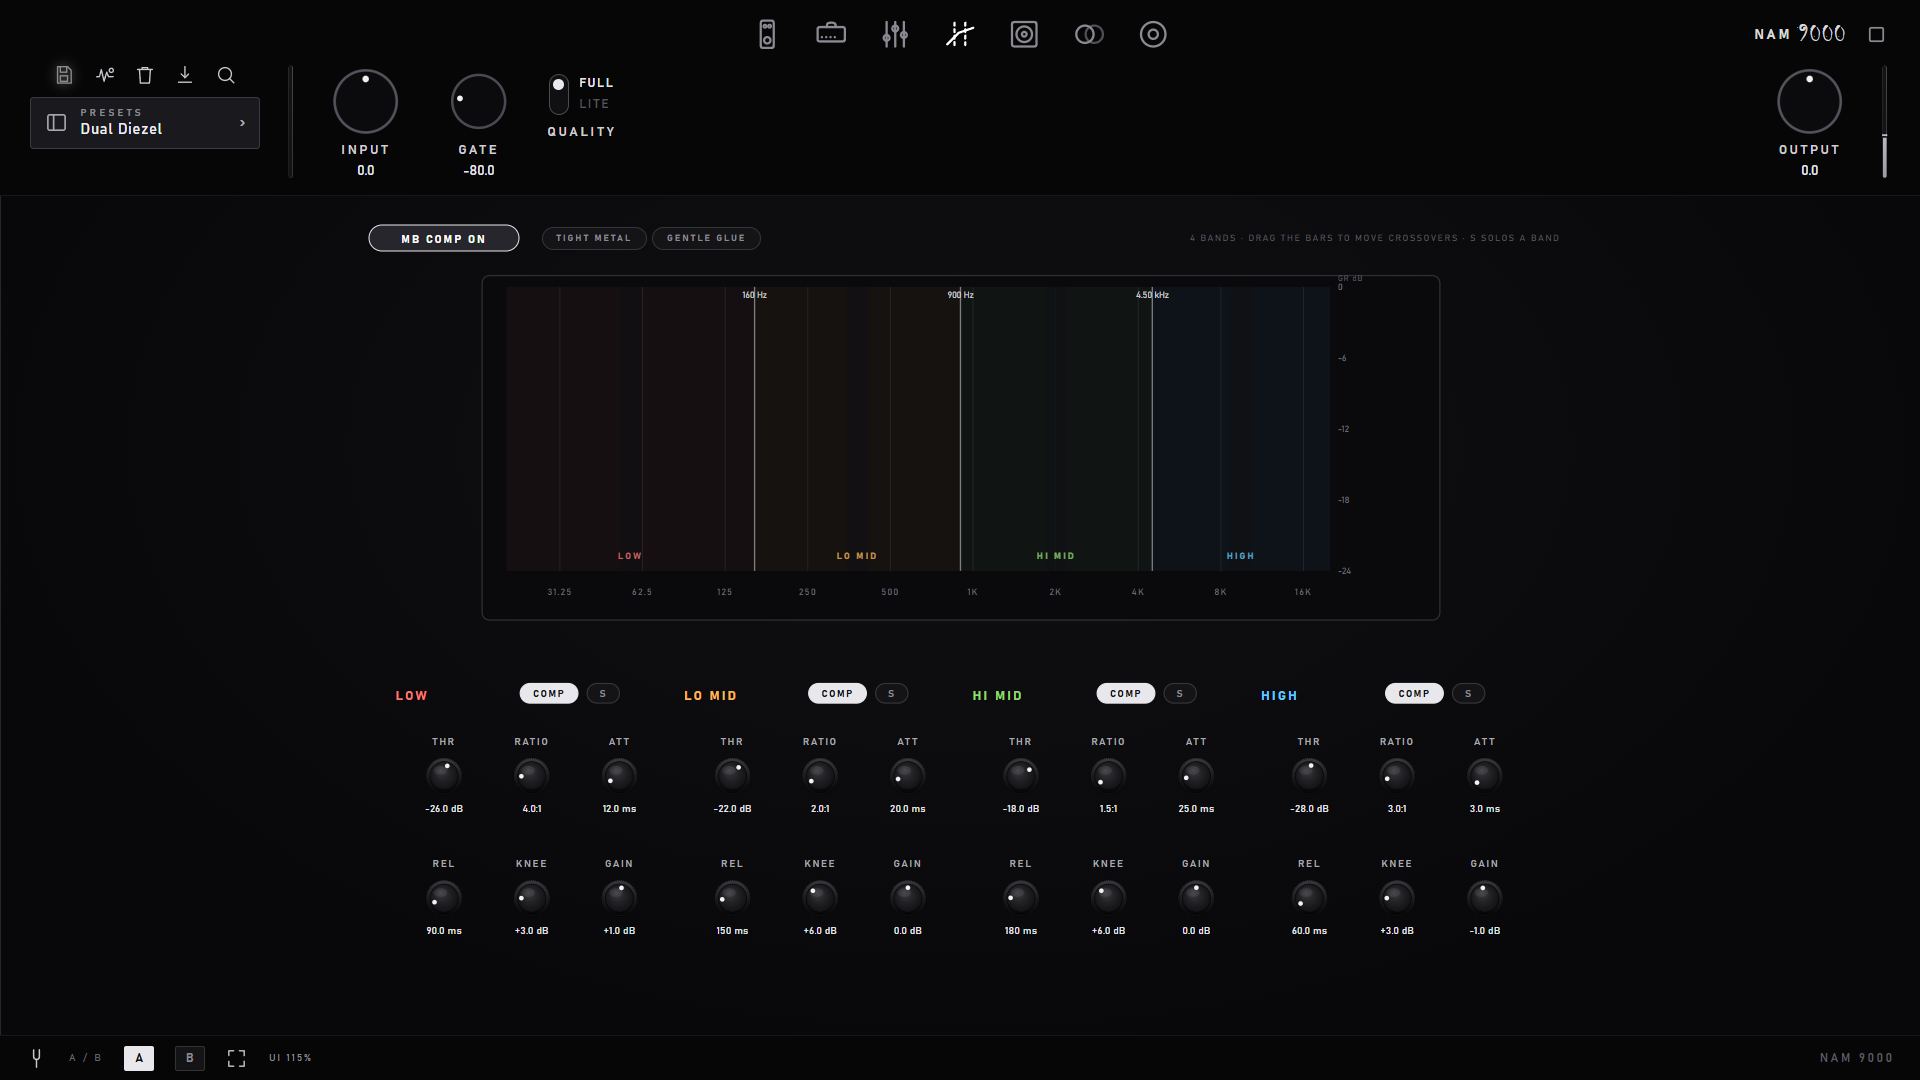
Four crossover bands, each with its own compressor and gain-reduction meter — tighten low-end chug without dulling the top, all inside the plugin.

The multiband compressor page
Four-band multiband compressor with per-band GR metering.

9 · Cabinet

Real impulse-response convolution

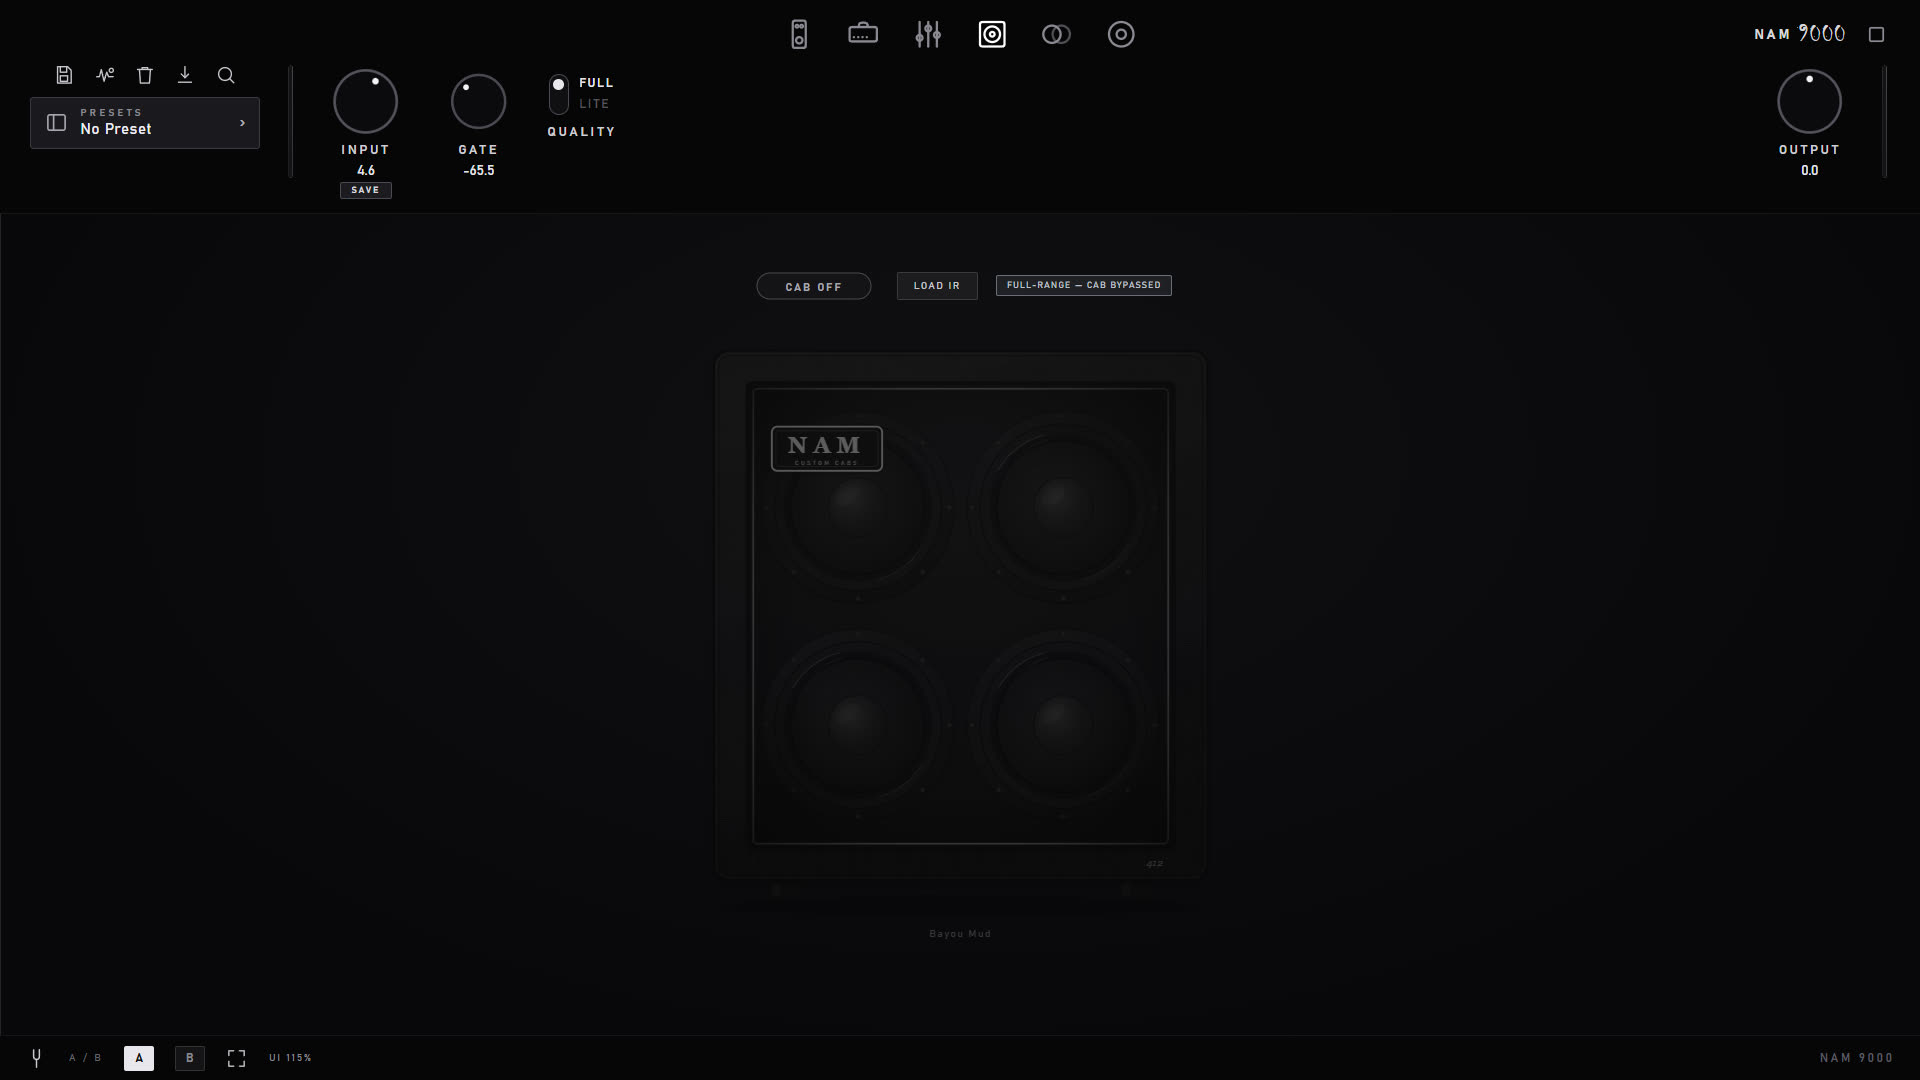
Load any .wav IR, or the factory blended-speaker cabinet. IRs are loudness-normalized on the guitar band so swapping a cab changes tone, not level.

The cabinet page
The cabinet page — single IR, or the Pro dual-mic blend.

Cycling cabs — the fastest way to find the one

Comparing IRs by name is hopeless; comparing them by ear takes seconds. The ‹ › arrows beside the cab step through your whole IR library one at a time, and the left/right arrow keys do the same while the cab page is open — so you can keep both hands off the mouse, play a riff, and step until it sits. Each step names the IR and its position ("IR 14/57") in a toast.

The browser follows along and colour-codes what is loaded: a gold bar and gold name marks the IR in slot A, and a blue bar and blue name marks the one in slot B when you're running the dual-mic blend — so a long list always shows you where you are, and which of the two mics you're about to replace. (Amp rows use the same gold marker for the profile that's playing.)

In dual-cab mode the arrows step whichever cab you last touched, and clicking a cab's arrows also selects it — so the keyboard always follows the mic you're working on.

10 · Time FX

Delay and reverb to finish the chain

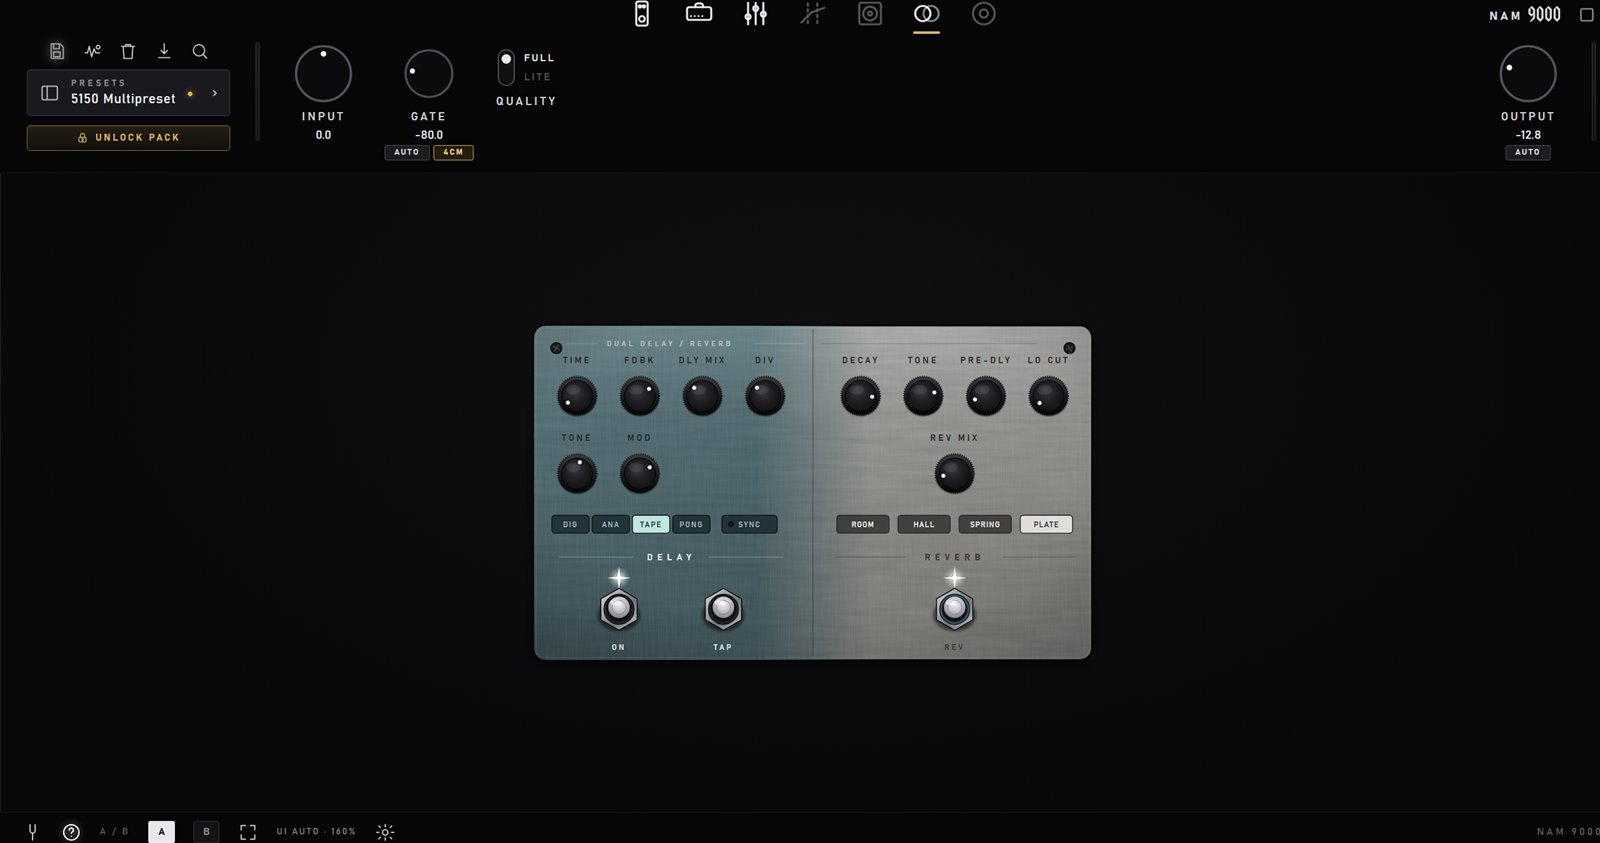
Post-cab time effects on one dual pedal: a multi-mode delay with tempo sync, and a four-engine reverb — the last stage before your rig is a mix-ready channel.

The dual delay/reverb pedal
One dual pedal: delay on the left, four-engine reverb on the right.

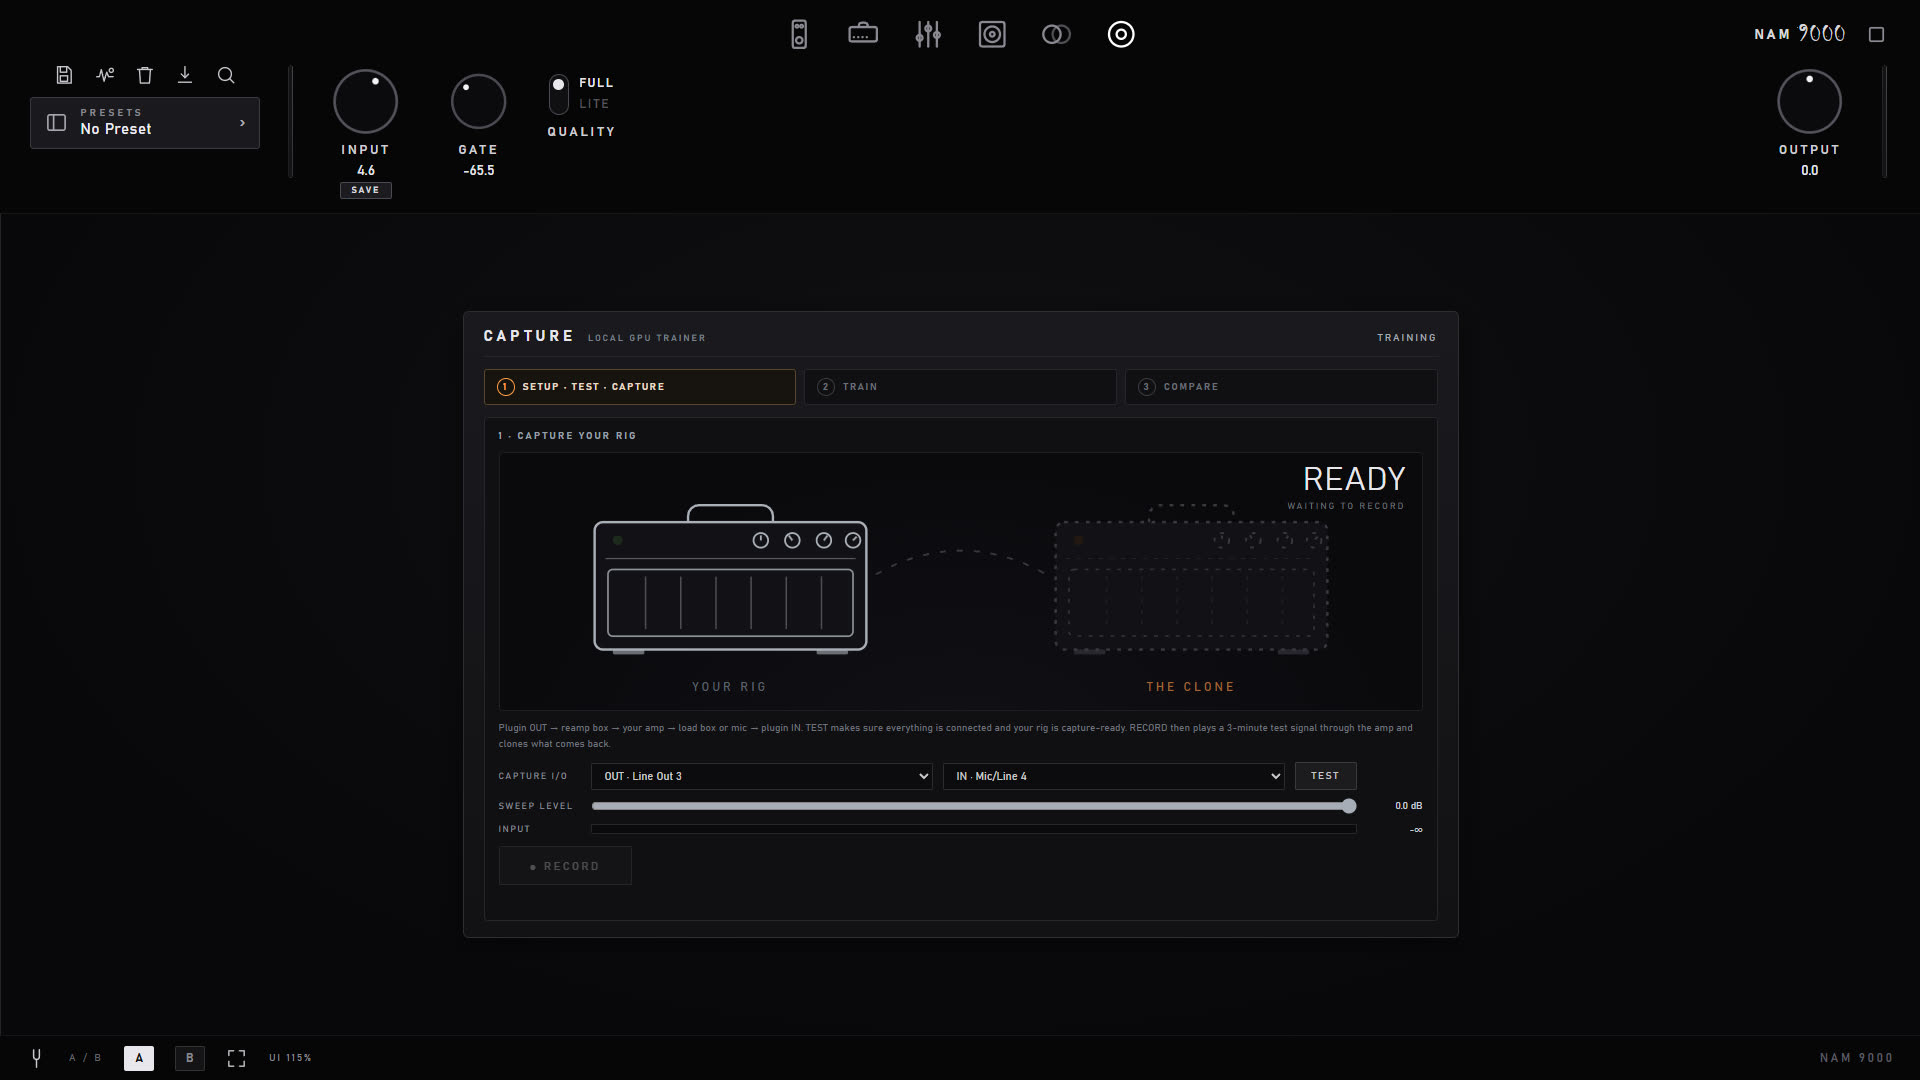
11 · Capture & training studio

Clone your own gear

Built-in profiler: play a test signal through your amp, pedal or whole rig and train a neural model of it — on your own NVIDIA GPU on Windows, or free in the cloud on Mac (and on any machine without an NVIDIA card). No separate software.

The capture studio page
The capture studio — a guided clone / test / train / compare flow.
  1. Test checks your connection, latency, noise floor and repeatability so you know the capture will be clean before you commit.
  2. Record plays a ~3-minute sweep through your rig and captures the return, with live progress.
  3. Train builds the model on your GPU; the match quality (ESR) is reported so you know it's good.
  4. Compare A/Bs the clone against the real thing.

You choose how hard it trains: 50 up to 1000 epochs (100 is a few minutes, 1000 can take hours on a modest GPU), or set an ESR target — 0.02 down to 0.002 — and training stops the moment the tone match is that close, whichever comes first. An easy amp finishes early instead of grinding through every epoch; a difficult one uses the ceiling you allowed.

Captures of your own gear export to NAM-compatible hardware (Dimehead, HoTone, Darkglass and others) as a standard .nam — free, no strings. Your captures now also record the input level they were made at (only when INPUT CAL is switched on — a guessed figure is worse than none), so a hardware player can drive them exactly as your rig was driven.

Taking a whole preset to hardware PRO

A bare profile is an ingredient, not a sound: it does not know which channel, which gain position, which drives or which cab you dialled. So the thing worth exporting is the preset. Right-click any preset in the library → Export for hardware… and the app first measures your playing level and tells you what to set on your unit, then renders the whole rig — amp, drives, tone stack, EQ and cab — and trains it into one .nam. A gain-swept amp is baked at the knob position; a multichannel head exports the channel that is lit (save a preset per channel for the rest). Your own plain captures still export directly on every edition; purchased pack content cannot be exported on its own, only dialled into a preset and exported that way.

No NVIDIA GPU? Train in the cloud

Local training needs an NVIDIA GPU — but you don't need one to capture. Record the sweep as usual, then hit Export for TONE3000: the app saves your recording alongside the standard input file and opens tone3000.com/capture, where you upload both and train in the browser for free. Download the finished .nam and load it straight back into NAM 9000. Same capture, no graphics card required — it's the recommended path on machines without an NVIDIA GPU, and the standard path on macOS.

12 · Library & TONE3000

Thousands of tones, organized your way

A browser for your profiles, cabs and presets — searchable, sortable, and yours to organize into groups — plus the whole TONE3000 library built right in.

The profile browser
The browser — tabs for profiles, cabs, presets and TONE3000; groups down the left, filters up top.

Groups — make your own shelves

A library of thousands is only useful if you can carve it up. Any profile, IR or preset can live in a group of your making, and the browser renders them as collapsible folders with counts:

Groups are real folders inside your library, so anything you organize in the app is organized on disk too. Factory content stays read-only.

Finding things fast

TONE3000 — sign in once

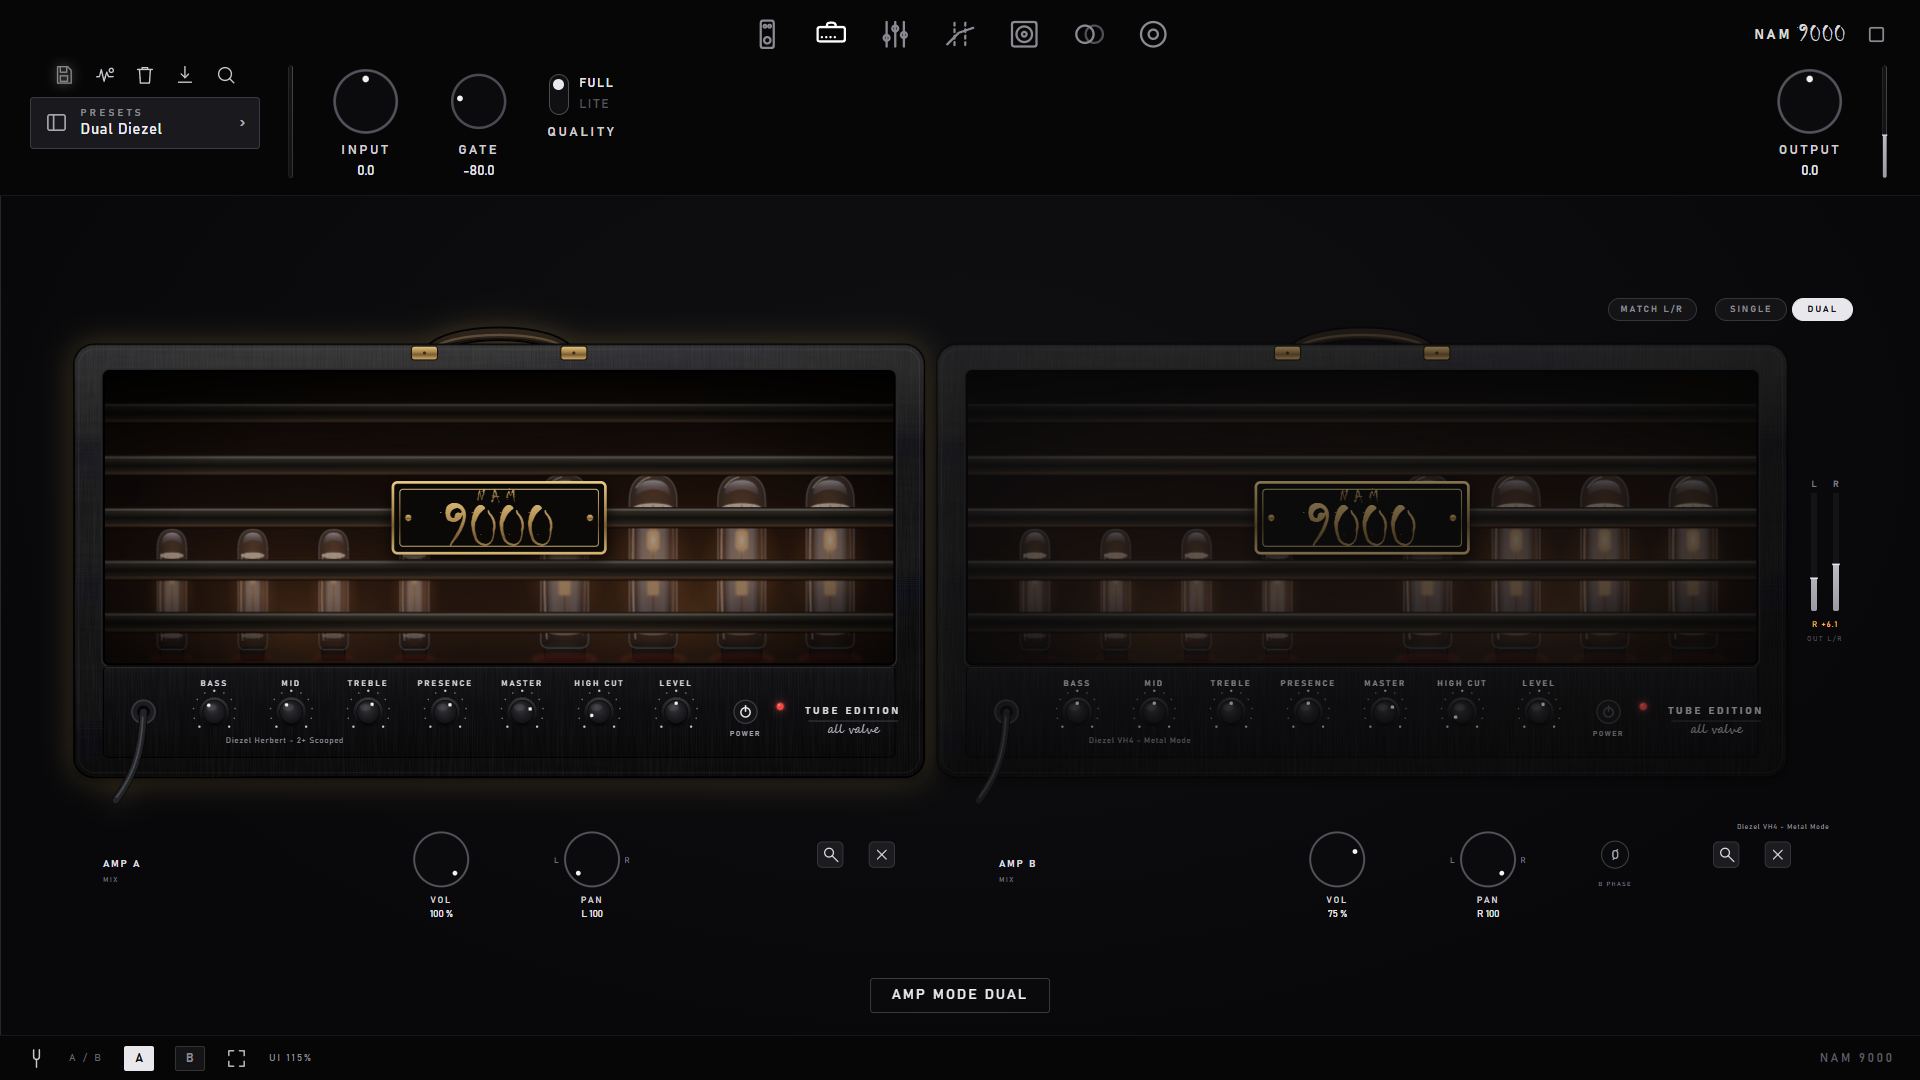
13 · Dual rig PRO

Two full amps, two cabs, one plugin

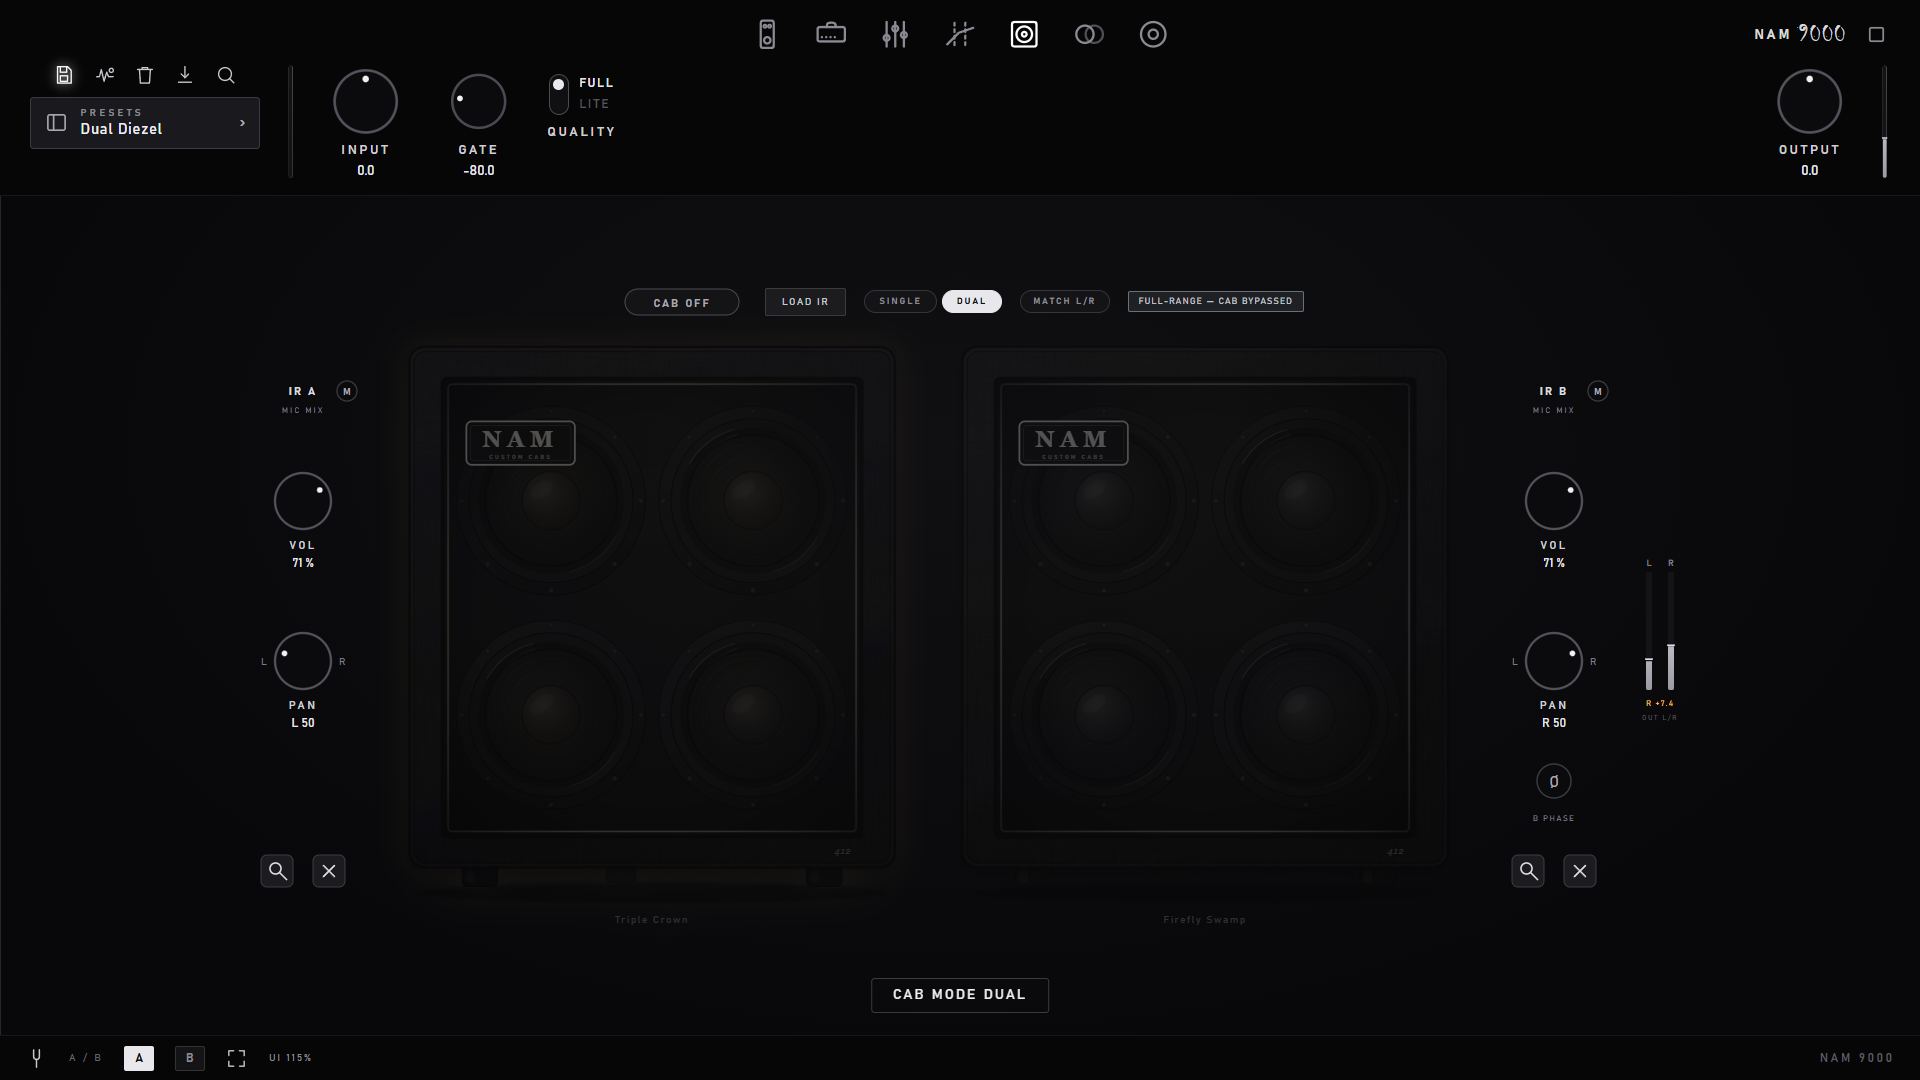
Run two independent amp captures in parallel, each with its own mix panel, and blend two cabs — a two-mic blend on one amp, or a full cab per amp.

Dual amp rig
Dual amp rig — a level/pan/phase mixer under each head.
Dual cabinet
Dual cab — two-mic IR blend with per-mic level, pan and phase.

The plugin is mono-in by design; the stereo image is created intentionally inside the box. Engaging dual mode pans the two amps hard left and right by default — the right way to run a dual rig (a wide, dimensional tone, each amp on its own side). Summing two amps to the centre instead phase-cancels the low end, so the plugin warns you if both land near centre or if the two captures have different native sample rates.

Why a dual rig is panned, never summed — the measurements

Two nonlinear amp captures must never be summed onto one channel. We measured it on the real audio engine (the internal DspProbe --dual harness, driving the actual mixer with noise and reading back the spectrum) and found two independent things go wrong when two amps share a channel:

Panned hard left and right, neither mechanism can fire: each amp lands on its own channel, so there is nothing to cancel or comb against. Measured that way each side is identical to that amp running solo (0.0 dB difference across the spectrum) — the second amp adds stereo width and depth, not a tonal fight. That is why the plugin spreads the amps hard L/R the instant you go dual, nudges you with a warning if they drift back toward centre, and — as below — renders a dual amp rig to two separate files rather than one blend.

Render Rig — what a dual rig exports

Render Rig bakes the live rig into a standard .nam. Because a .nam is mono in and out, what it writes depends on the rig:

IR alignment — automatic, plus a fine trim

Blending two IRs has its own classic failure mode: every IR carries its own leading dead time (mic distance, processing padding), and two IRs whose impulses don't land at the same instant comb-filter when summed — the same hollow sound, from the cab side. Hardware modelers ship an "align" control in their cab blocks for exactly this reason.

NAM 9000 handles it in two layers:

If a blend still thins out, the per-mic phase button (Ø) flips polarity — alignment fixes timing, Ø fixes polarity; together they cover both ways two mics can fight. All of it applies before Render Rig bakes a blend, so exported profiles are phase-true too.

14 · MIDI control

A controller, a footswitch, and no mouse

Built for the standalone app: right-click anything, pick MIDI LEARN, move the control on your controller. Free in both editions.

Your mapping belongs to the machine, not to the tone — it lives in midi_map.json beside your library, and presets never carry it. A DAW project keeps its own copy, so reopening a session restores the mapping it was built with.

In the standalone, tick your controller under Options ▸ Audio/MIDI Settings first — the panel tells you when it hasn't seen any MIDI yet.

In a DAW, use your host first

This is honest advice rather than a limitation: your host can bind a CC to any plugin parameter and record it as automation, which plugin-side MIDI cannot. What the plugin adds in a host is the half automation can't reach — switching amp channels and loading presets from a footswitch. In Logic the AU receives no MIDI at all: the only way to give an audio-effect AU MIDI input is to change its type, which would have made every saved Logic project open with the plugin missing. That trade wasn't worth making. Use Smart Controls or automation in Logic, and the standalone when you want feet on it.

15 · Presets & packs

Save your own, or start from ours

A preset stores the whole rig — every pedal, the amp, both EQs, the cab and the time FX — as one recallable channel strip. Share them as bundles, or unlock curated packs.

Saving and recalling

Preset packs

Optional paid packs add curated, mix-ready tones. Each hero pack ships every amp twice — the finished full rig (cab baked in) and an amp-only "DI" profile to pair with your own cab or IR — plus that amp's continuous GAIN sweep, 16 to 31 real captures across its gain range on one knob. Multichannel amps are a pack of their own: a whole head with working channel switching, and one is included with Pro. Unlocking is fully offline: paste your license key into the in-app Unlock dialog. No account, no activation server.

Unlocking what you bought

Your license key arrives by email within a minute of ordering, and it is also attached as a .namlicense file. Everything below happens in the plugin's browser panel — there is no website login and no activation server. Keys work offline, never expire, and stay valid on every machine you own.

Look for the gold UNLOCK PACK button under the preset name, top-left. That is the one place keys go in — for packs, pedals, multichannel amps and Pro alike.

Drive pedals and multichannel amps are one step: paste the key, play. Pedals already ship inside NAM 9000, so there is nothing at all to fetch — before you buy, one plays for 30 seconds at a time marked PREVIEW, and your key simply stops the clock. Multichannel amps are far too large for the installer, so the app fetches the head once by itself the first time you play it — as a single download for the whole amp, all channels — and keeps it. Unlocking one turns the audition into ownership: the browser row gains a YOURS badge, the five-minute clock never appears again, and the amp is there after a restart, offline.

NAM 9000 Pro is the same routine: paste the key and the Pro features light up in the free app. Pro also includes one multichannel amp of your choice — your order email carries a personal one-time code, so you pick the amp you want and pay nothing for it.

Amp and preset packs are the one case with two steps, because a pack is a file. Download the .nampack from the link in your email, click INSTALL .NAMPACK in the browser panel and choose it, then click UNLOCK PACK and paste your key. (Buying a multichannel amp gets you its pack as an optional bulk download too — handy for a studio machine that is kept offline — but you never need it.)

On builds before 1.8.1 the button is instead a small UNLOCK pill in the filter row under the browser's search box — easy to miss, which is why it moved.

Keys are personalized with your email address, which is shown to anyone who activates them. Please don't share them.